| Now that the points timing
is in the ballpark it's time to finish the job. Fire it up and bring the
engine up to operating temperature (around the block a few times just to
let the neighbors know your're alive and well should do). Once it's warmed
up and idling normally set the idle to about 900 rpm. This may be higher
than you normally set the idle but it's what the specs call out and puts
the advance closer to where it should be for normal riding. I usually set
my idle to aournd 500-600 rpm for normal riding but for tuneups I bump
it up to the 800-900 range. If you don't have a tach most dwell meters
also serve as a tachometer and connects to the positive lead on your coils.
If you don't have a tach or or access to a dwell meter you will have to
guestimate. If it's sitting there loping like a Harley chances are the
idle is a little low. ;-) Bump it up till it purrs smoothly but not where
it's growling for you to put it in gear.
Connect the timing light
inductance clamp to the #4 plug wire and hook the power cables to a 12
volt battery. Any 12 volt automotive or cycle battery will do as long is
it can provide 12 volts (meaning a dud won't work). The timing light draws
very little power. Some even come with built-in power supplies so if you're
lucky eoungh to have one you're a step above me already. :-D
 Again I'm statring with 1-4.
Shut the engine down for a minute and carefully loosen the three screws
on the timing plate to where they are just snug enough to hold the plate
in postion but not so tight you're not able to nudge the plate. Fire it
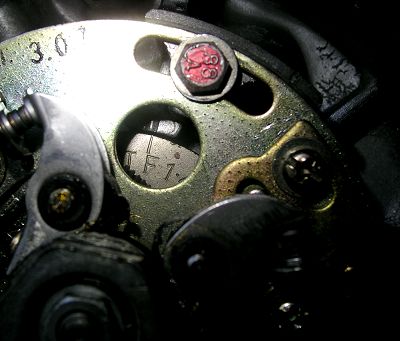
up again and with the light aimed at the peephole it should look like the
image above. It might bounce arouund a little and that is normal. The idea
is getting the F mark lined up with the index mark most of the time. If
the F appears left of, or before the index mark the timing is advanced
and the plate will need to be nudged clockwise. To the right of the index
mark retarded and the plate needs to go counter-clockwise.
If it is still way off and
you see only the edge of the T mark or a couple of marks next to each other
with nothing stamped under them and the 4 nearby, um, Houston, we have
a problem. It may be necessary to go back to square one, re-gap the points,
and go through the static timing steps again. I'm confident that you won't
wind up there if you've taken your time and taken it one step at a time.
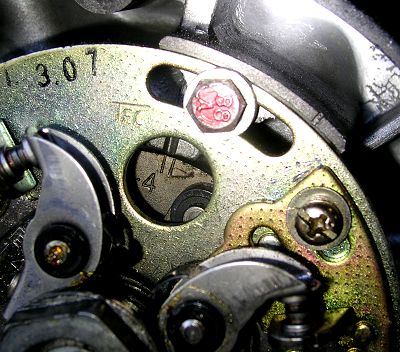
 To check that the spark advance
is working as it should while you've still got the light aimed reach up
and crack the throttle some. Not to redline or anything but rev it up some.
If the spark advance is working you should see the two advance marks hovering
under the index mark (shown in the image avove) while revved and then returning
to the F mark when it idles down again.
Once 1-4 is good to go shut
the bike down tighten down the three timing plate screws and move on to
2-3. Move the timing light clip to the #3 plugwire, loosen the 2-3 timing
plate screws to just snug and fire it up again. Repeat the same process
nudging the 2-3 timing plate into position. Remember, nudge the plate's
edges, not the 2-3 timing plate screws or the points. Once there shut her
down again. Tighten up the screws, unhook the timing light, put the points
cover back on, and the old houndog is ready to go. Time for a spin. You
can put the tools up when you get back. ;-)
Houndog750 |

